IDEs & Debugging
Starting the IDE and setup
IDEs are more complicated tools than other simple text editors you may have used. This complexity gives you greater power but it can also sometimes make it difficult to know what features are available and how to configure them. Largely in this course we will introduce the configuration as it's needed but there's always a small amount of setup needed upfront.
We're going to create a simply Python package called utils and use that as a way of exploring functionality that the IDE provides.
Start by launching your IDE:
The first time you launch PyCharm it will walk you through some common settings and then prompt you to create a project.
The first window that comes up is the user agreement. Like most user agreements you have no choice but to accept it so do so and move to the next screen. Then there's a data sharing question which you can choose either way.
If you are using Anaconda on Windows then you should set up a new Conda environment for use in this course. A Conda environment is a small copy of Python in a special folder on your computer into which you can install whatever dependencies your Python project needs. See the official documentation (under "Creating a new environment") for instructions on this. Make sure you select Python 3.6 or greater and call your environment utils. Then, got to the Home tab in Anaconda and install and launch VS Code.
VS Code is an IDE which is designed to work with many different languages and won't assume that you are going to be writing Python code until you start doing so. It will largely stay out of your way until it needs to ask you something.
When you start VS Code you will be greeted with a welcome page with links to common tasks, documentation etc. The only thing you'll need to to do before starting is close the privacy statement box in the bottom-right.
Creating a project
Once all that setup is done, click on the "New Project" button. A project in PyCharm usually refers to a directory with Python files inside it. If you are working on multiple different Python packages you can create a project for each.
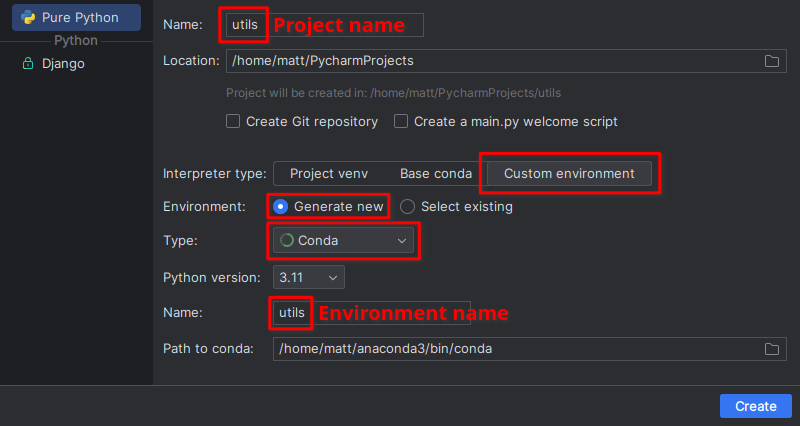
In this course we will be creating a new Python package from scratch. It will have a a default name for the project, and will be automatically creating a directory for it with that same name. Change the project name utils.
There are checkboxes for both creating a Git repository and creating a main.py file. Feel free to set the Git box either way, but uncheck the main.py box.
Make sure that under the "Interpreter Type" section you have "Custom Environment" selected.
For "Environment", select "Generate new" and set the "Type" to "Conda". Finally, set the "Name" again to utils.
If you have installed Anaconda yourself from anaconda.com then you may have to set the Path to conda to point to wherever you installed it, probably C:\Users\<username>\anaconda3\condabin\conda.bat if you are on Windows.
The following screenshot shows the layout of the dialog box. The paths you see in the screenshot will likely not match what you have. If you have any questions about what to type in these boxes, please ask.

Finally click "Create".
VS Code operates around the concept of "open folders". Depending on the types of files that you open in those folders, different functionality will be enabled automatically. You would normally have one folder per project you are working on. By default, VS Code will not create folders for you so the first thing we need to do is click "Open folder..." under "Start" on the welcome screen or go to File → Open folder.... Use the dialog box that pops up to create a new folder called utils and open it.